

Looking for more contacts for your business on Facebook?
While the Meta ad platform is one of the best ways to get highly targeted leads, it can be a bit confusing to set up the right optimization for your campaign.
This article covers the difference between instant forms and website conversions, when to use each option, and how to set up Facebook lead generation ads.
Instant Forms vs Website Conversions on Facebook Ads
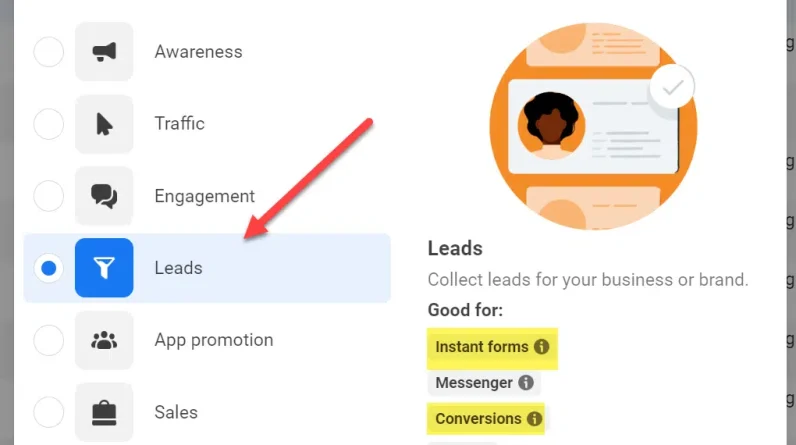
The first step in setting up lead generation ads is to understand what type of campaign you want to run. There are two main types within the “Leads” campaign objective on the Meta platform:
Instant Forms Conversions.
(In my opinion, the Messenger or Calls conversion options are not as effective at the time of this writing.)
The biggest difference is that instant forms all happen on Facebook. This ad will look like any other ad, but you’ll see the designation Facebook Form in the ad.

When you click the Sign Up button (or the call to action you used), you’ll get a pop-up box that allows you to add your name, email, and any fields the advertiser has requested.
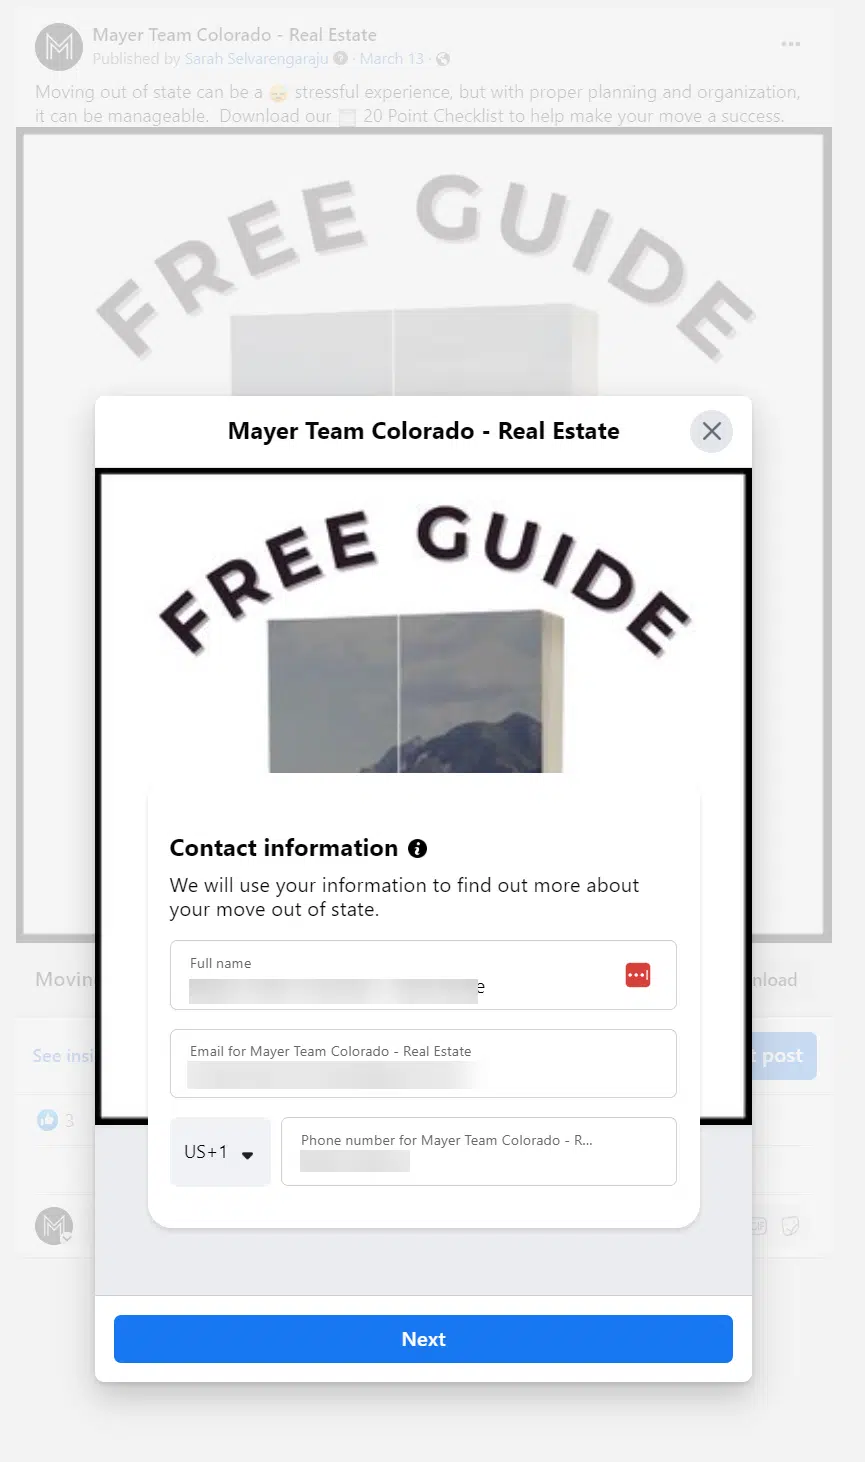
A nice feature of the instant form is that the name, email, and phone number fields are pre-populated with the person’s information from Facebook, so the user doesn’t have to type that information.
This can lead to better leads because you don’t have to type on a mobile phone and you know you’re getting the correct phone number and email address. The user can edit this information before submitting if necessary.
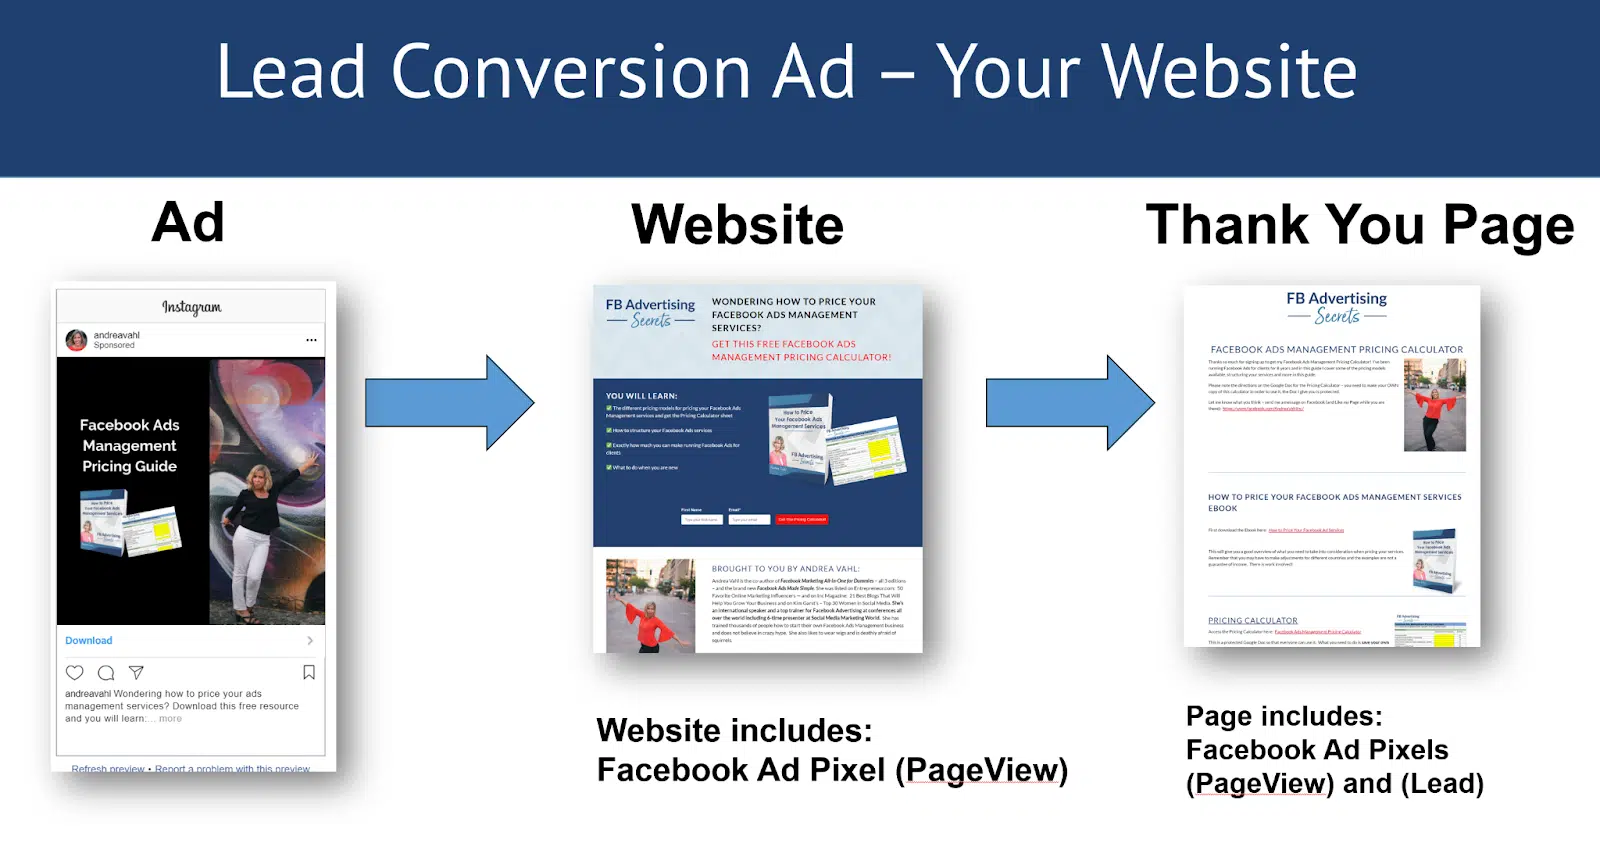
With a conversion ad, you send traffic switched off Facebook and on your website, which has your Facebook pixel installed.
You must install your Facebook pixel to track your conversion ad correctly.
You should also have a “thank you” page where you can install the standard main pixel event code.
Facebook will track an ad conversion whenever someone clicks on your ad (or views your ad if you’ve also selected View attribution) and then lands on the “thank you” page.
Get the daily search newsletter marketers trust.
When to use instant forms vs website conversions
If you don’t have a landing page but want to collect leads, the lead generation ad is a perfect solution.
You can redirect to a website or even have a Call Now button after someone fills out the form.

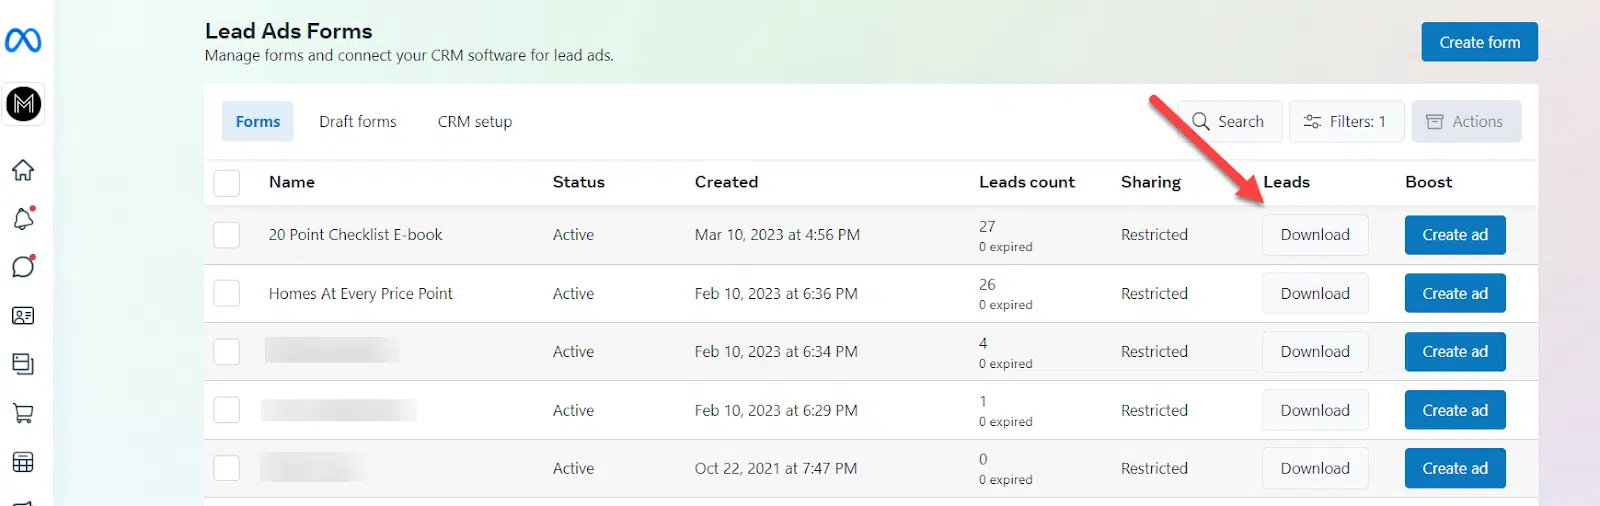
One disadvantage of instant forms is that you have to manually download the contacts from the lead form section of your Facebook page in the Business Suite area.
You can pay for a tool like Zapier to automate the process and send leads to your email or CRM as they come in.
If you have a website, or a “landing page” or “narrowing page” that you want traffic to go to, you’ll need to select the conversion ad whenever you can install the Facebook pixel.
If you can’t redirect to the “thank you” page after someone submits their information, you may be able to install the pixel with one click, but you’ll need to check with your web developer or find out how to install it on your own
You can also try an instant form ad and a website conversion ad to see which gives you better results.
Typically, I find that instant form ads can get you cheaper leads, but website conversion ads can get you higher quality leads because of higher intent.
How to set up Facebook lead generation ads
Creating lead generation ads is similar for both instant forms and website conversion ads, but there are some key differences that I’ll outline for each.
Steps for Instant Forms:
Create the contact form (under Instant Forms) in the Business Suite area of the Facebook page. You can also create this in Ads Manager as you create your ad, but I think it’s a little easier to do it ahead of time. Connect your contact form to Zapier if you want for automation. Create your contact ad and select this form.
Steps for Website Conversion Ads:
Add the main Facebook pixel code to your landing page. Add the base pixel and standard event codes to your “thank you” page (usually people choose Lead as their standard event). Create your lead ad and send traffic to your landing page, optimizing around the lead pixel.
I’ll walk you through the flow of creating a lead generation ad and highlight the differences along the way.
Creating the instant form
Below are the steps to create an instant form in Business Suite. (The steps are similar if you’re doing it from Ads Manager)
Step 1: Go to Business Suite and select Lead Forms from the menu
You can access it directly here.
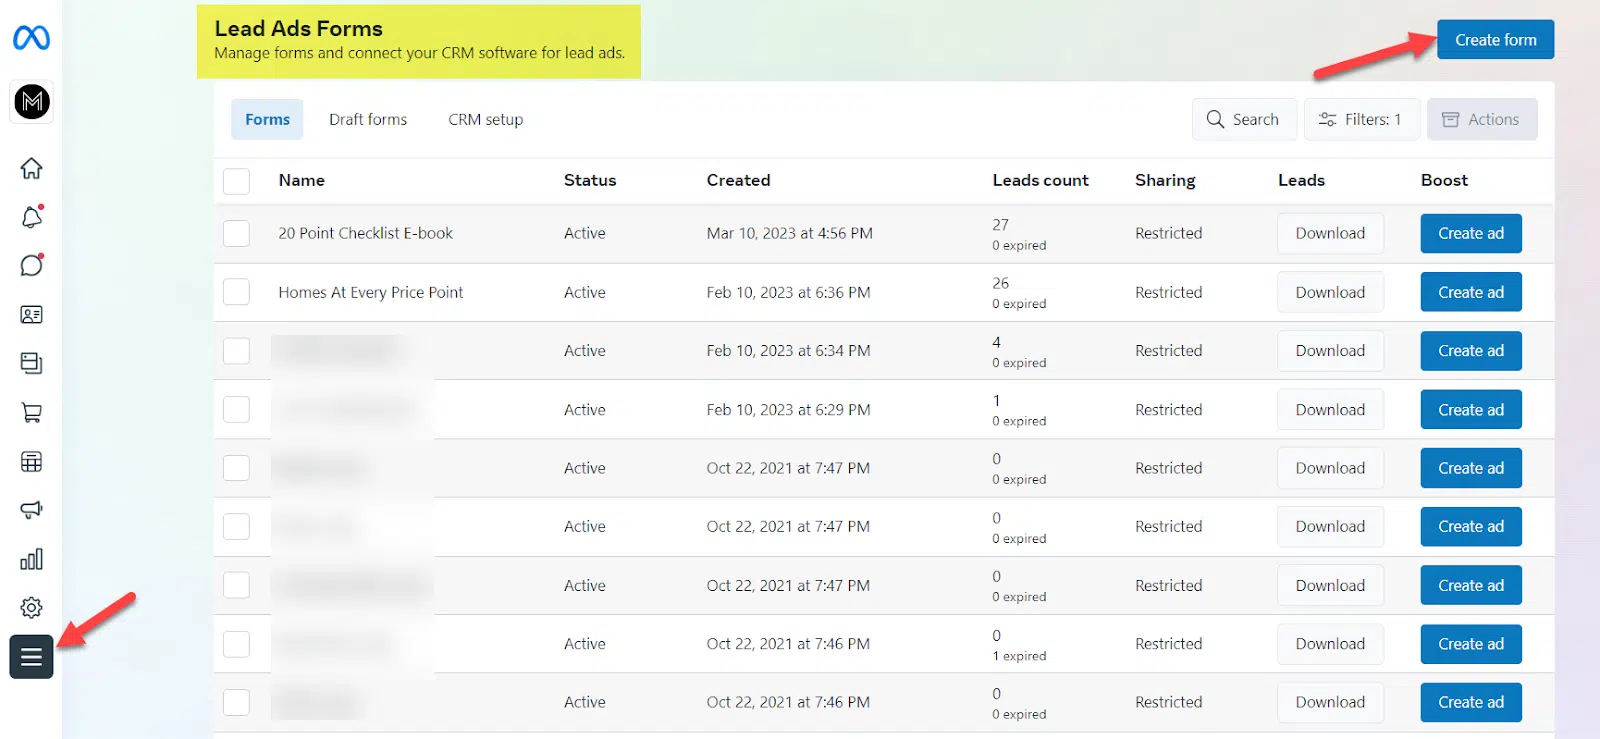
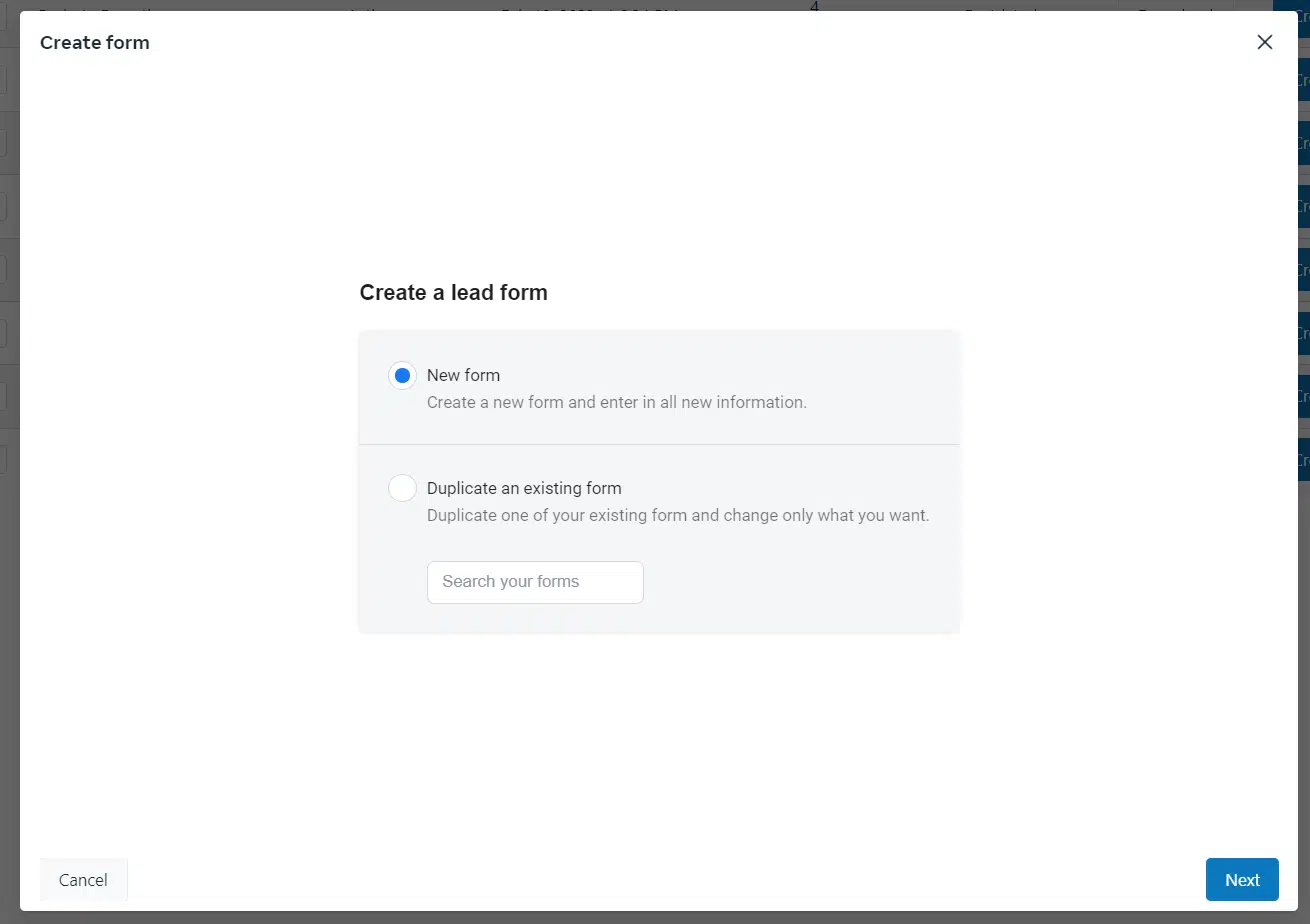
Step 2: Select Create Form
You will see a pop-up asking if you want to create a new form or duplicate an existing one. Select New Form and then Next.
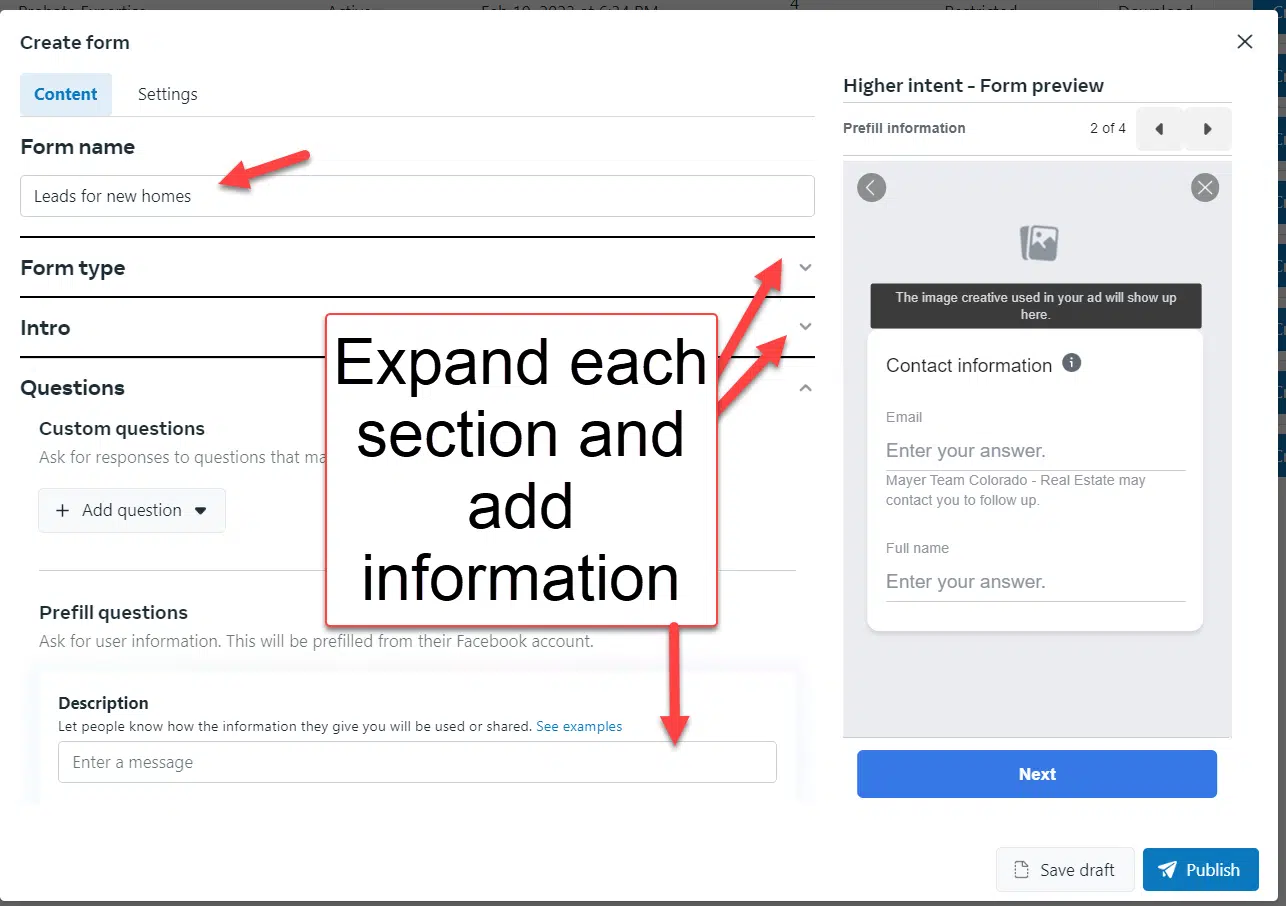
Step 3: Add information for your form
First, give your form a name. Use a clear name for what you’re offering so it’s easy to choose when creating your ad.
For example, use a descriptive name for a special lead magnet, free call, coupon, or other special gift.
You will need to expand each section to:
Add the title and text for the popup window (Intro). Select what information you want to get from the user (Questions). Set your privacy policy and what you want to happen after filling out the form (ie stay on Facebook, go to your website, or call now).
Step 4: Select Publish
Once your instant form looks the way you want it to in the preview section, you can publish it.
You can’t edit it after you publish it, so save it as a draft if you want to make changes. But it must be published for use in ads.
Facebook ad creation
Step 1: Go to Facebook Ads Manager and select Create, then Contacts
You can access the Ads Manager directly here.
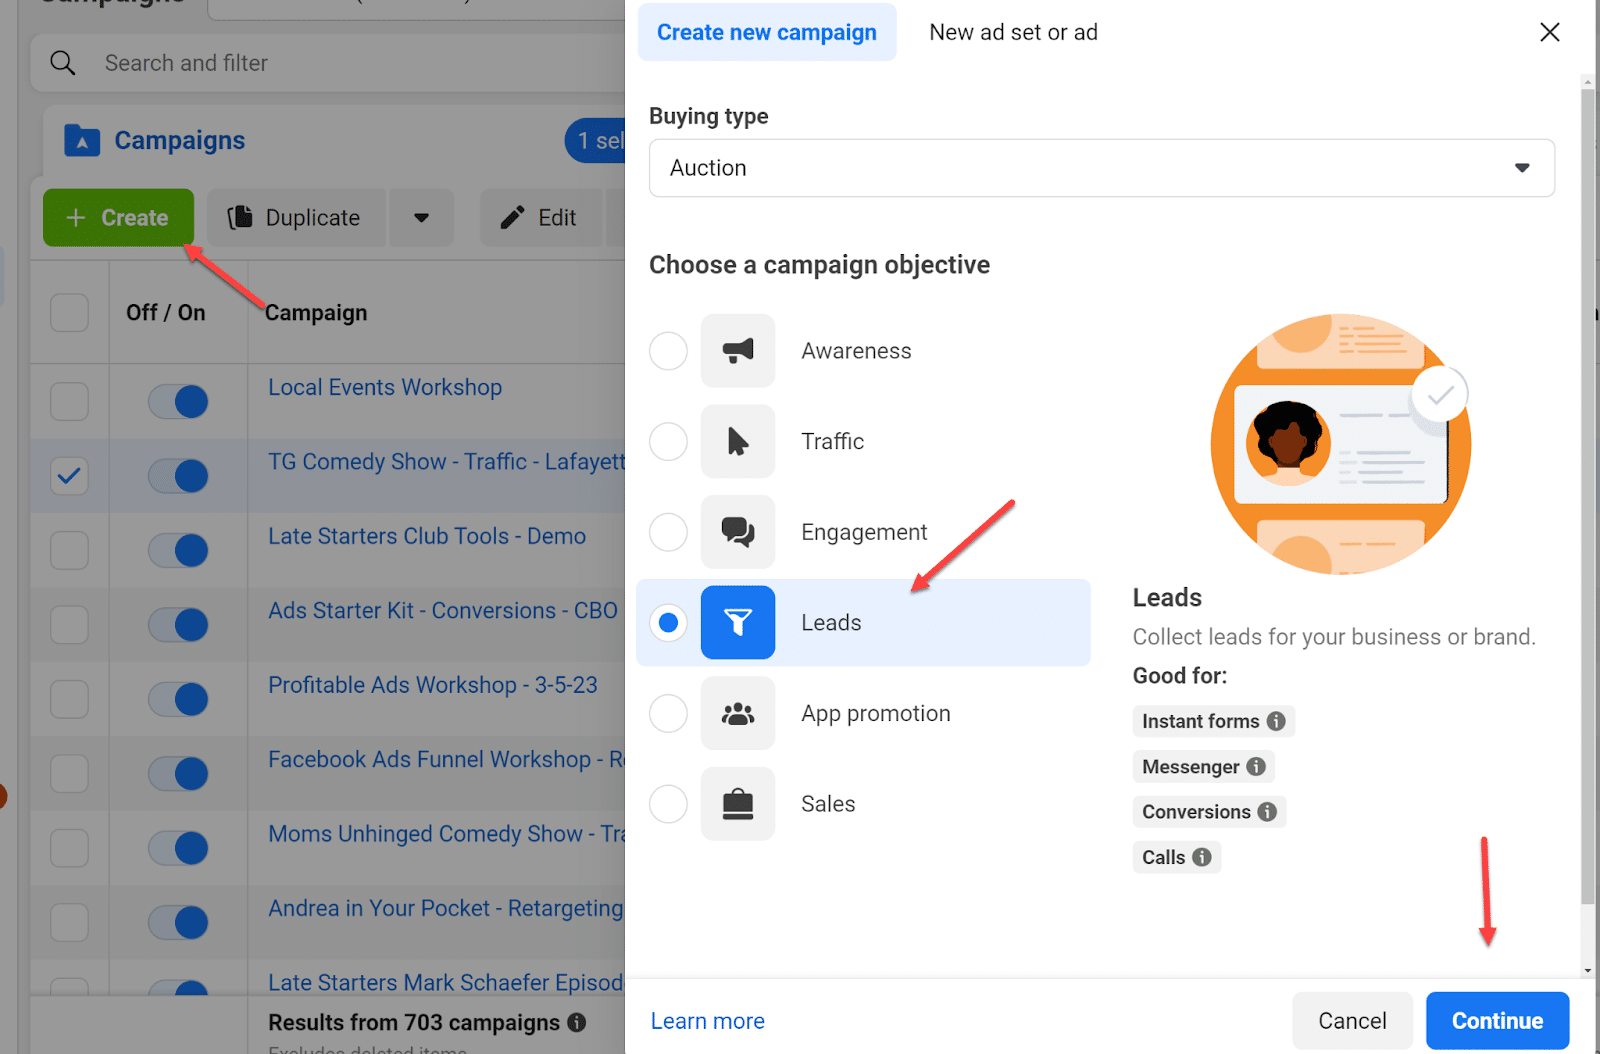
When you select Continue, you’ll see your campaign, ad set, and ad structure.
You may be prompted for a “Streamlined” setup, but choose Manual so you can select the options you want.
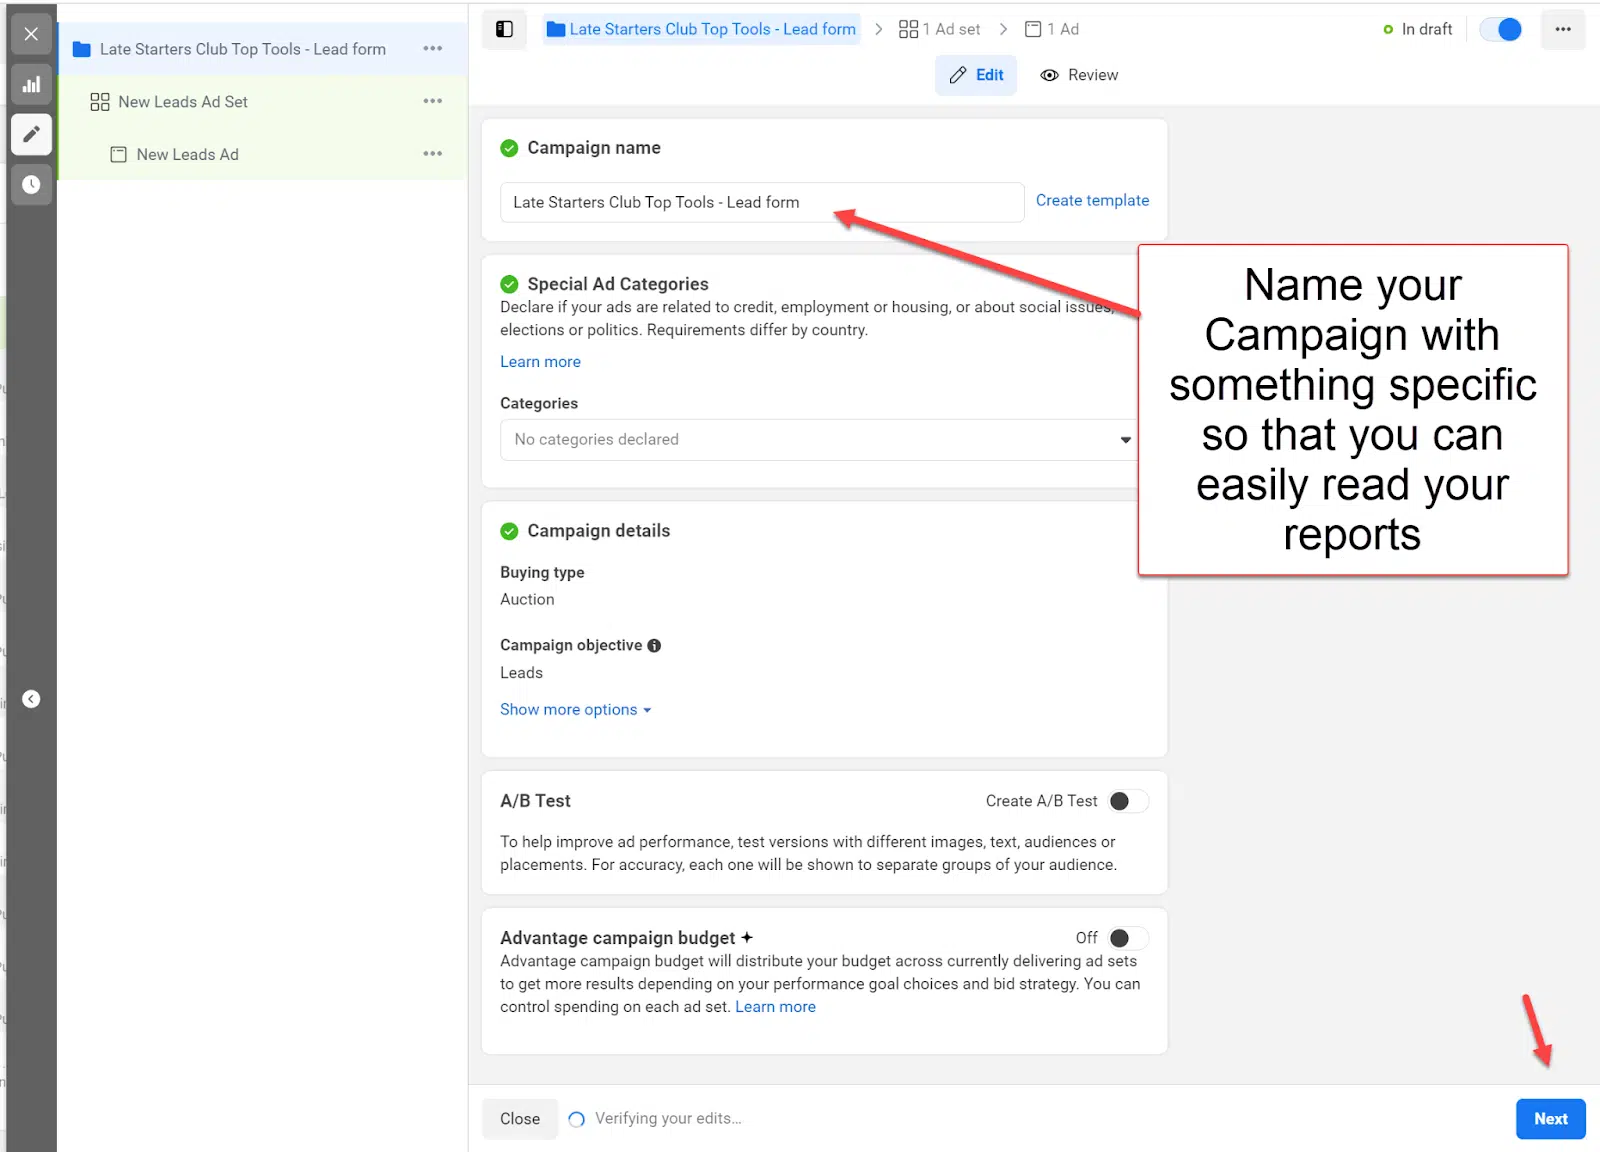
Step 2: Name your campaign
Give your campaign a meaningful name so it’s easy to read your reports, then select Continue.
I also like to add the optimization type to my campaign name to make it clear. Then select Next.
Step 3: Choose website conversions or instant forms at the ad set level
At the ad set level, you’ll choose whether to send people to your website for website conversion ads, or if you’ve created an instant form, you’ll select the instant form’s conversion location.
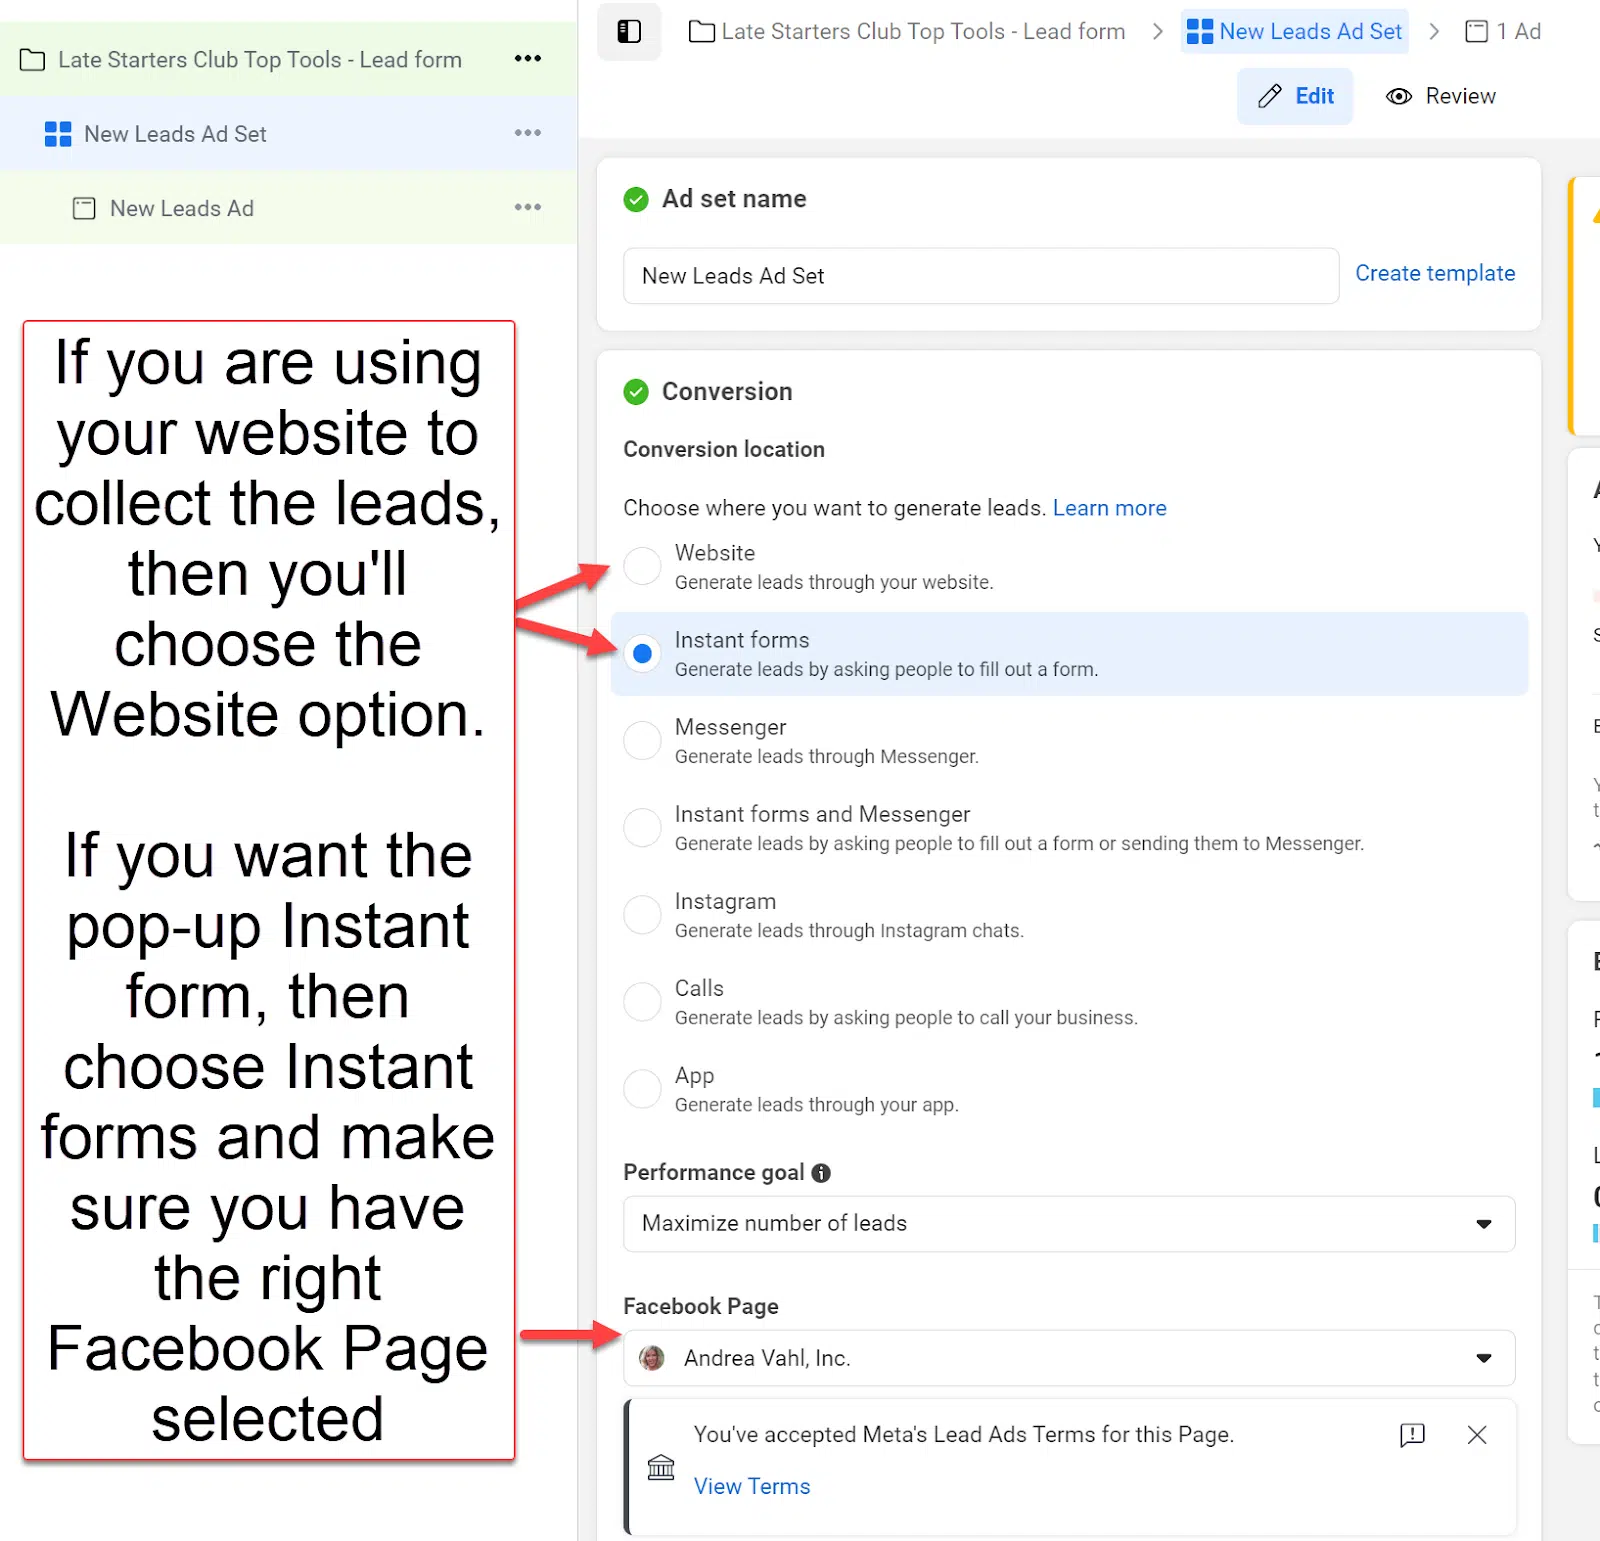
If you chose the website option, you must choose the pixel conversion event and at this stage.

Step 4: Set your targeting, budget, and location
Within the scope of this article, I won’t go into all the steps of targeting, budgeting, and ad placement.
But you’ll complete these steps at the ad set level and then select the Next button to create your ad.
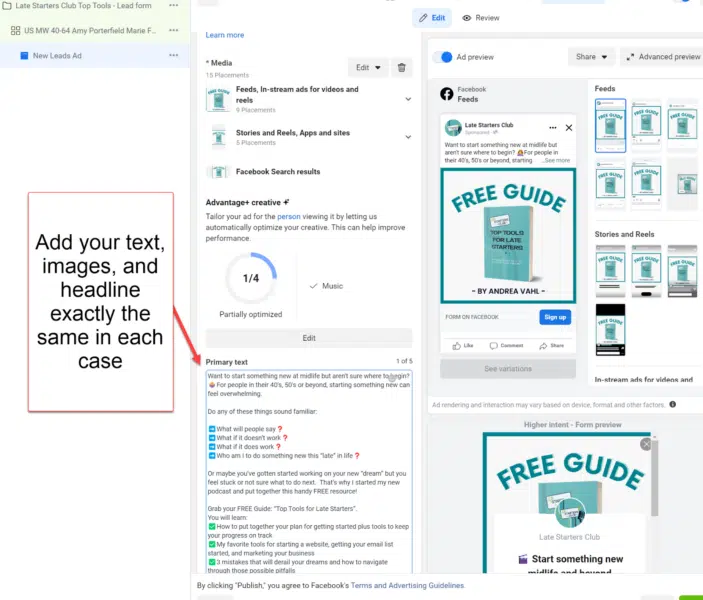
Step 5: Create your Facebook ad
The ad text, images and title will be exactly the same in each case.
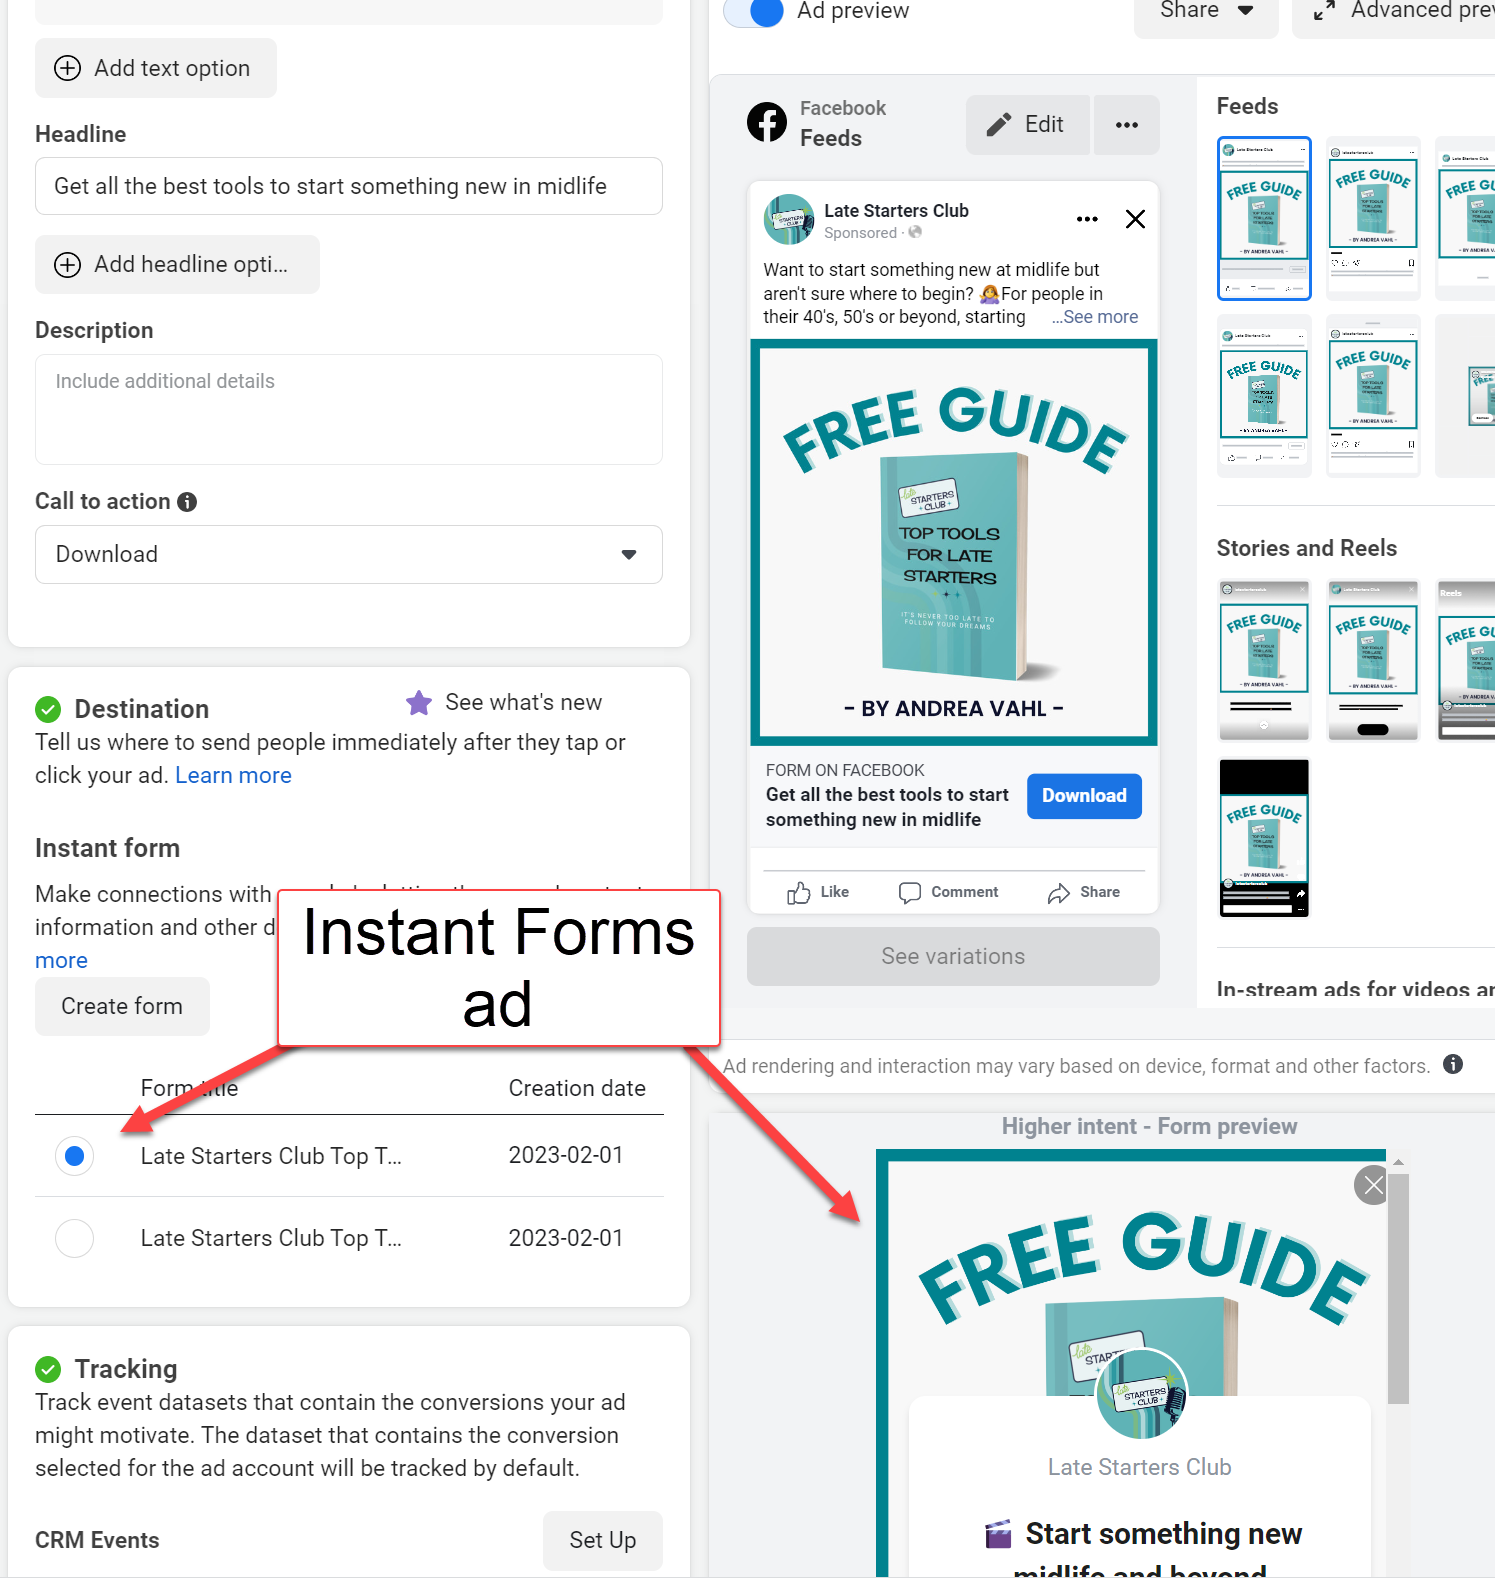
Step 6: Make sure you have selected the correct snapshot shape or pixel
If you selected the instant form option, the default value will usually be the most recent one you created.
Website conversion ads will target the website address and you should also ensure that you have selected the correct Facebook pixel.
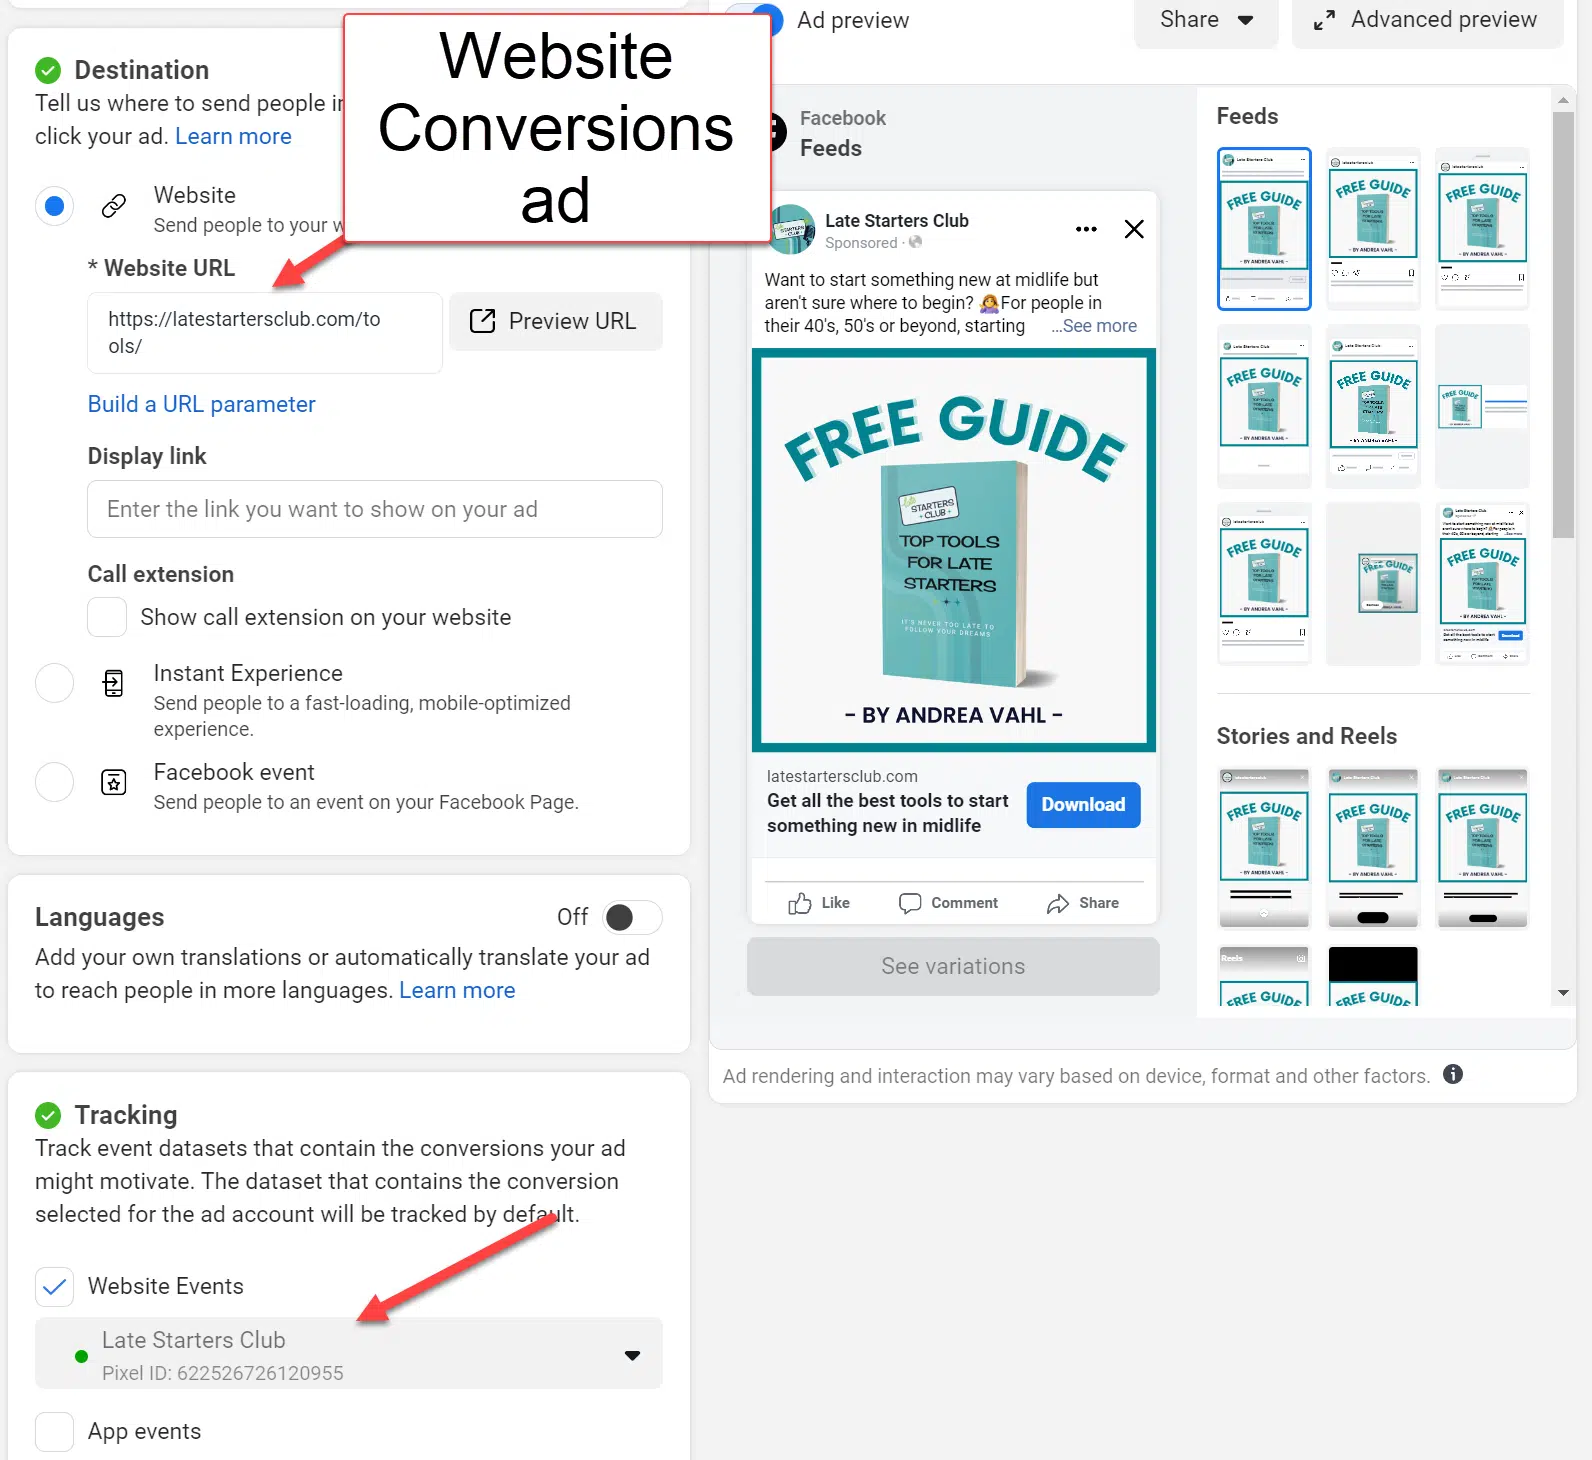
You can see in these two examples that the ad itself can look exactly the same.
Step 7: Click “Publish”
Once you’ve finished setting up your ad, you can click Publish and your ad will go through the review process.
Both types of ads have advantages and disadvantages. What’s important is testing what works for your business and balancing lead volume and quality.
Facebook is an amazing tool for generating leads. Both options can generate high quality leads for your business.
The views expressed in this article are those of the guest author and not necessarily Search Engine Land. Staff authors are listed here.
[ad_2]
Source link